>>아두이노 메가2560 보드
USBISP 3.0
Provram AVR Connect


Flash Program
input hex file 선택은 아두이노 설치된 디렉터리의 부트로더
또는 스케치 빌드된 파일 hex 파일을 프로그램할수 있습니다.

Fuses 값 확인.
LockBits 확인.


>>아두이노 메가2560 보드
USBISP 3.0
Provram AVR Connect
Flash Program
input hex file 선택은 아두이노 설치된 디렉터리의 부트로더
또는 스케치 빌드된 파일 hex 파일을 프로그램할수 있습니다.
Fuses 값 확인.
LockBits 확인.
>> 아나콘다3 실행 패스 설정 없이 하는 경우 일반 파워쉘, 도스프롬프트에서 처리하는 경우 SSL 관련 에러가 나오는 것을 방지할수 있습니다.
> pip is configured with locations that require TLS/SSL,
however the ssl module in Python is not available
>아나콘다3 패스 설정
%USERPROFILE%\anaconda3
%USERPROFILE%\anaconda3\Library\mingw-w64\bin
%USERPROFILE%\anaconda3\Library\bin
%USERPROFILE%\anaconda3\Library\usr\bin
%USERPROFILE%\anaconda3\Scripts
주의점 : 마지막 conda.exe 있는 디렉터리만 패스 설정해주면 안됩니다.
We briefly touched upon this topic in our post about Arduino serial input, but inspired by this excellent tutorial by Stephen Brennan we thought it would be fun to create a more rigid command line interface (aka. CLI) for the Arduino than what we did in the serial input post. We recommend you read Brennan’s tutorial regardless since it contains a lot of important info about this topic and programming in general which we won’t mention here.
Having a CLI on an embedded system like the one in this blog post is quite different from a shell in Linux for instance since you usually don’t have an OS to back you up with multiprocessing and all that jazz. There are ways around this, but we’ve kept everything sequential for simplicity’s sake in this example. This means that several tasks can’t run simultaneously and that one task has to finish before starting a new one.
The purpose of a CLI like this on an Arduino is to have the ability to send text commands to it during runtime to execute certain tasks, such as controlling a servo, displaying text on a screen or launching a rocket.
We’re basically going to go quickly go through the code in chunks in this post. But first we’ll briefly explain what our program does.
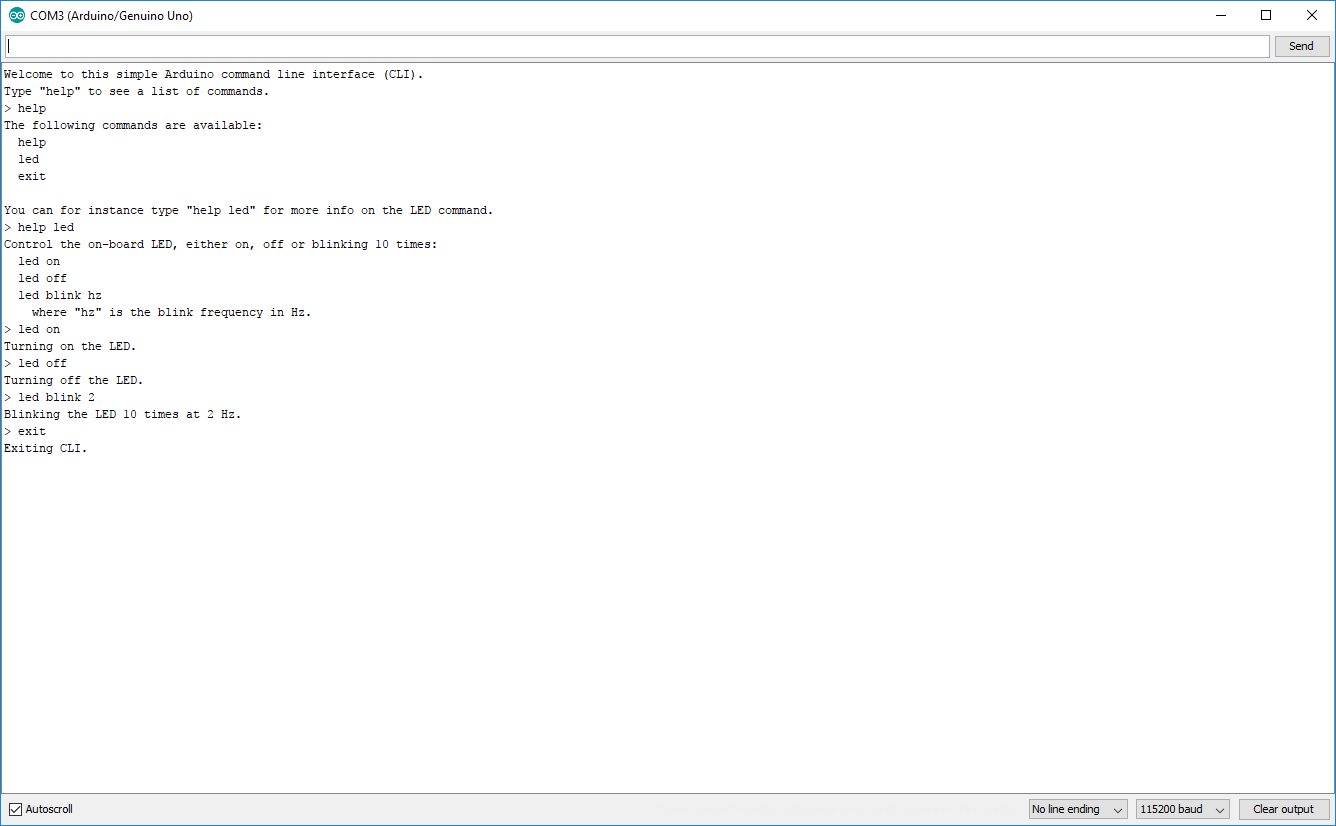
The primary purpose of this specific code is to control the on-board
LED tied to pin 13 on the Arduino. You can either turn it on, off or
having it blink 10 times at a given frequency. We’ve also included a
help command which explains what each command does as well as an exit
command which just puts the program in a while(1) state.
The code itself is just over 200 lines where many are just pure printing functions, so the core functionality is not that complex.
Let’s start with the global variables, defines and the setup() and loop() functions.
#define LINE_BUF_SIZE 128	//Maximum input string length
#define ARG_BUF_SIZE 64		//Maximum argument string length
#define MAX_NUM_ARGS 8		//Maximum number of arguments

int LEDpin = 13;
int blink_cycles = 10;		//How many times the LED will blink
bool error_flag = false;

char line[LINE_BUF_SIZE];
char args[MAX_NUM_ARGS][ARG_BUF_SIZE];

//Function declarations
int cmd_help();
int cmd_led();
int cmd_exit();

//List of functions pointers corresponding to each command
int (*commands_func[])(){
	&cmd_help,
	&cmd_led,
	&cmd_exit
};

//List of command names
const char *commands_str[] = {
	"help",
	"led",
	"exit"
};

//List of LED sub command names
const char *led_args[] = {
	"on",
	"off",
	"blink"
};

int num_commands = sizeof(commands_str) / sizeof(char *);

void setup() {
	Serial.begin(115200);
	pinMode(13, OUTPUT);

	cli_init();
}

void loop() {
	my_cli();
}
When the user enters a command, the program will compare it to the strings in commands_str and call the function in commands_func with the same index.
The cli_init() function which is called in setup() just displays a short welcome message while my_cli() is where the the magic starts to happen.
void cli_init(){
	Serial.println("Welcome to this simple Arduino command line interface (CLI).");
	Serial.println("Type \"help\" to see a list of commands.");
}


void my_cli(){
	Serial.print("> ");

	read_line();
	if(!error_flag){
		parse_line();
	}
	if(!error_flag){
		execute();
	}

	memset(line, 0, LINE_BUF_SIZE);
	memset(args, 0, sizeof(args[0][0]) * MAX_NUM_ARGS * ARG_BUF_SIZE);

	error_flag = false;
}
Three important functions are called within my_cli(). These are:
read_line() – this waits for input from the user and stores it in the line string.parse_line() – this divides the input into arguments and stores them in the args list. The delimiter used is a space.execute() – this calls the correct function based on the user’s input.The memset functions reset the line string and the args list to zero.
void read_line(){
	String line_string;

	while(!Serial.available());

	if(Serial.available()){
		line_string = Serial.readStringUntil("\n");
		if(line_string.length() < LINE_BUF_SIZE){
		  line_string.toCharArray(line, LINE_BUF_SIZE);
		  Serial.println(line_string);
		}
		else{
		  Serial.println("Input string too long.");
		  error_flag = true;
		}
	}
}

void parse_line(){
	char *argument;
	int counter = 0;

	argument = strtok(line, " ");

	while((argument != NULL)){
		if(counter < MAX_NUM_ARGS){
			if(strlen(argument) < ARG_BUF_SIZE){
				strcpy(args[counter],argument);
				argument = strtok(NULL, " ");
				counter++;
			}
			else{
				Serial.println("Input string too long.");
				error_flag = true;
				break;
			}
		}
		else{
			break;
		}
	}
}

int execute(){
	for(int i=0; i<num_commands; i++){
		if(strcmp(args[0], commands_str[i]) == 0){
			return(*commands_func[i])();
		}
	}

	Serial.println("Invalid command. Type \"help\" for more.");
	return 0;
}
In the read_line() function we don’t really guard against very long inputs. It is still stored in the line_string Arduino string. This means that very long inputs can still mess with our memory.
In the parse_line() function, strtok() is
the real work horse. This function splits a string into several
substrings where it finds the delimiter specified, which in our case is a
white space. Read more about strtok() here.
The execute() function is pretty straight forward. Notice that the function in commands_func at index i is called when returning from this function within the for loop.
int cmd_help(){
	if(args[1] == NULL){
		help_help();
	}
	else if(strcmp(args[1], commands_str[0]) == 0){
		help_help();
	}
	else if(strcmp(args[1], commands_str[1]) == 0){
		help_led();
	}
	else if(strcmp(args[1], commands_str[2]) == 0){
		help_exit();
	}
	else{
		help_help();
	}
}

void help_help(){
	Serial.println("The following commands are available:");

	for(int i=0; i<num_commands; i++){
		Serial.print("  ");
		Serial.println(commands_str[i]);
	}
	Serial.println("");
	Serial.println("You can for instance type \"help led\" for more info on the LED command.");
}

void help_led(){
	Serial.print("Control the on-board LED, either on, off or blinking ");
	Serial.print(blink_cycles);
	Serial.println(" times:");
	Serial.println("  led on");
	Serial.println("  led off");
	Serial.println("  led blink hz");
	Serial.println("    where \"hz\" is the blink frequency in Hz.");
}

void help_exit(){
	Serial.println("This will exit the CLI. To restart the CLI, restart the program.");
}
Here you have all the help functionality. When the user types help and press enter, the cmd_help() function is called. This function checks what the user wrote after help and call the correct function based on that. help_help(), help_led() and help_exit() are just functions that print stuff to the terminal.
int cmd_led(){
	if(strcmp(args[1], led_args[0]) == 0){
		Serial.println("Turning on the LED.");
		digitalWrite(LEDpin, HIGH);
	}
	else if(strcmp(args[1], led_args[1]) == 0){
		Serial.println("Turning off the LED.");
		digitalWrite(LEDpin, LOW);
	}
	else if(strcmp(args[1], led_args[2]) == 0){
		if(atoi(args[2]) > 0){
			Serial.print("Blinking the LED ");
			Serial.print(blink_cycles);
			Serial.print(" times at ");
			Serial.print(args[2]);
			Serial.println(" Hz.");

			int delay_ms = (int)round(1000.0/atoi(args[2])/2);

			for(int i=0; i<blink_cycles; i++){
				digitalWrite(LEDpin, HIGH);
				delay(delay_ms);
				digitalWrite(LEDpin, LOW);
				delay(delay_ms);
			}
		}
		else{
			Serial.println("Invalid frequency.");
		}
	}
	else{
		Serial.println("Invalid command. Type \"help led\" to see how to use the LED command.");
	}
}

int cmd_exit(){
	Serial.println("Exiting CLI.");

	while(1);
}
The cmd_led() function is the only one that uses three
arguments. The third argument (blinking frequency) is used directly in
the calculation and not just to to define what function to call.
The cmd_exit() doesn’t check other arguments, so no matter what you write after exit, it will run normally.
The most important thing to learn from this blog post is the core building blocks my_cli(), read_line(), parse_line() and execute() and the general flow of the program. To make it possible for commands to run “simultaneously” you will have to make some fundamental changes to the program flow and make the read function non-blocking.
>> 지그비 개요
Zigbee는 왜 필요한가?
지그비 소개
지그비 특징
01.저전력 소모, 간단한 구현
02.한번의 배터리 충전으로 수 개월, 또는 수년간 사용 가능
03.활성 모드(수신, 송신), 슬립 모드를 가짐.
04.디바이스, 설치, 유지 등 모두 상대적으로 낮은 비용으로 가능
05.안전성(보안성)
06.신뢰성
07.유연성
08.매우 작은 프로토콜 스택
09.상호 호환가능 및 어느 곳에서나 사용 가능
10.네트워크당 높은 노트 밀집(지그비의 IEEE 802.15.4 사용은 네트워크에서 많은 디바이스를 다루는 것을 가능케 함. 이러한 특징으로 방대한 센서 배열과 네트워크의 통제가 가능)
11.간단한 프로토콜, 국제적으로 구현(지그비 프로토콜 스택 코드의 크기는 블루투스나 802.11의 사이즈에 비해 4분의 1 정도에 불과하다.)
지그비의 사용분야
□ 스마트 에너지
□ 홈 엔터테인먼트와 제어
□ 홈 인식 시스템
□ 모바일 서비스
□ 상업 빌딩
□ 산업용 공장
지그비 디바이스 타입
□ 지그비 코디네이터
□ 지그비 라우터
□ 지그비 엔드 디바이스

지그비 스택

802.15.4
지그비
애플리케이션/프로파일
지그비는 다음과 같은 프로파일을 지원한다.
지그비 스택 비교
| Feature | ZigBee 2006 | ZigBee 2007 | ZigBee Pro |
| Size in ROM/RAM | Smallest | Small | Bigger |
| Stack Profile | 0x01 | 0x01 | 0x02 |
| Maximum hops | 10 | 10 | 30 |
| Maximum nodes in network | 31,101 | 31,101 | 65,540 |
| Mesh Networking | Yes | Yes | Yes |
| Broadcasting | Yes | Yes | Yes |
| Tree routing | Yes | Yes | No |
| Frequency Agility | No | Yes | Yes |
| Bandwidth used by Protocol | Least | More | Most |
| Fragmentation | No | Yes | Yes |
| Multicasting | No | No | Yes |
| Source routing | No | No | Yes |
| Symmetric Links | No | No | Yes |
| Standard Security (AES 128 bit) | Yes | Yes | Yes |
| High Security (SKKE) | No | No | Yes |
| Profiles support | Home Automation | Home Automation | Home Automation Smart Energy Commercial Building Industrial Plant Monitor |
지그비 2006, 지그비 2007, 지그비 프로의 호환성
지그비, Wi-Fi, 블루투스 비교
| ZigBee | Wi-Fi | Bluetooth | |
| Application | Monitoring and Control | Email, Web, Video | Cable replacement |
| Physical/ MAC layers | IEEE 802.15.4 | IEEE 802.11 | IEEE 802.15.1 |
| Data Rate | 250 Kbits/s | 11 & 54 Mbits/sec | 1 Mbits/s |
| Range | 10-100 meters | 50-100 meters | 10 meters |
| Networking Topology | Mesh | Point to hub | Ad-hoc, very small networks |
| Operating Frequency | 2.4 GHz | 2.4 and 5 GHz | 2.4 GHz |
| Complexity (Device and application impact) | Low | High | High |
| Power Consumption | low | High | Medium |
| Number of devices for Network | 64K | 32 per access point | 7 |
| Network Latency New slave enumeration |
30 ms | - | 20 sec |
| Network Latency Sleeping slave changing to active |
Devices can join an existing network in under 30ms | Device connection requires 3-5 seconds | Device connection requires up to 10 seconds |
| Typical Applications | Industrial control and monitoring, sensor networks, building automation, home control and automation, toys, games | Wireless LAN connectivity, broadband Internet access | Wireless connectivity between devices such as phones, PDA, laptops, headsets |