>> Command Line Interface in Arduino’s Serial Monitor
We briefly touched upon this topic in our post about Arduino serial input, but inspired by this excellent tutorial by Stephen Brennan we thought it would be fun to create a more rigid command line interface (aka. CLI)
for the Arduino than what we did in the serial input post. We recommend
you read Brennan’s tutorial regardless since it contains a lot of
important info about this topic and programming in general which we
won’t mention here.
Having a CLI on an embedded system like the one in this blog post is
quite different from a shell in Linux for instance since you usually
don’t have an OS to back you up with multiprocessing and all that jazz.
There are ways around this, but we’ve kept everything sequential for
simplicity’s sake in this example. This means that several tasks can’t
run simultaneously and that one task has to finish before starting a new
one.
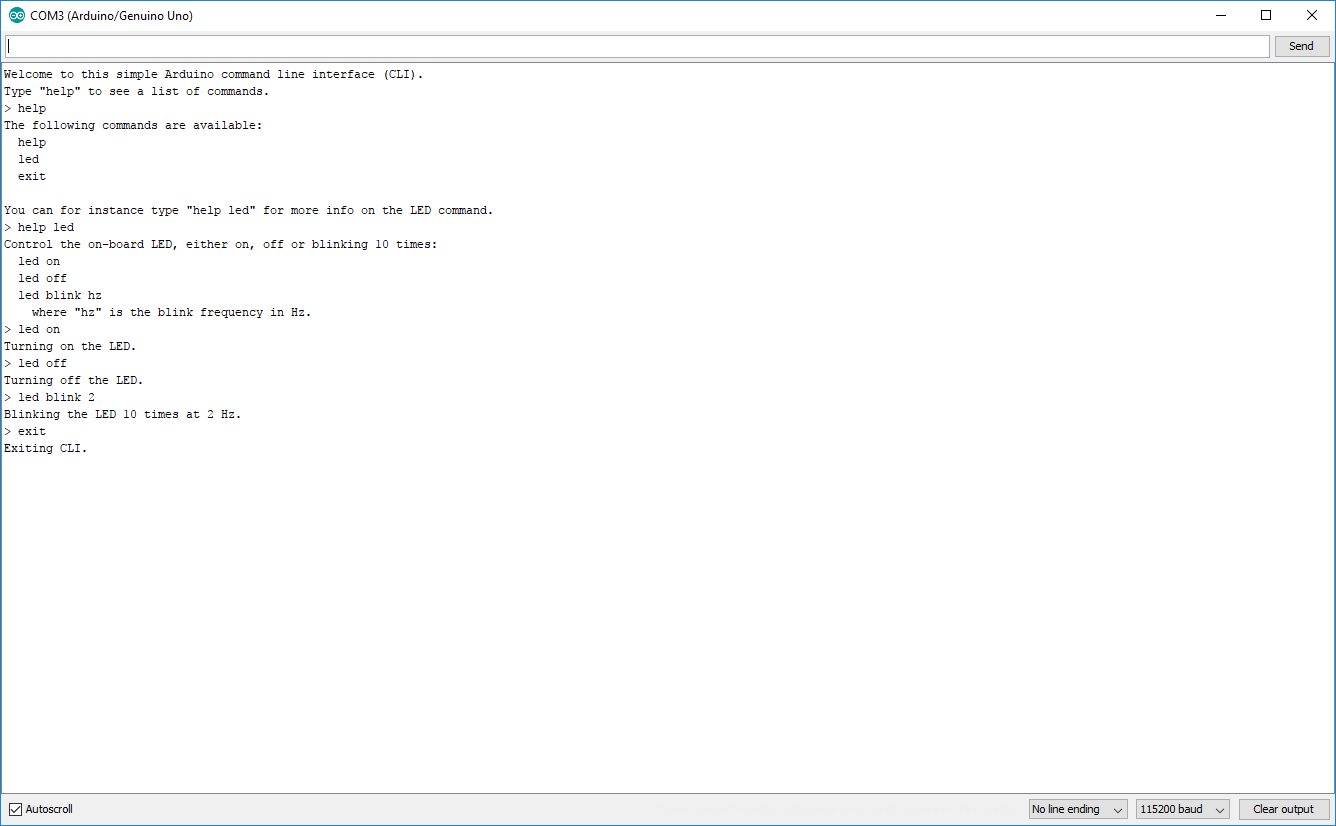
What our CLI looks like in Arduino’s serial monitor.
The purpose of a CLI like this on an Arduino is to have the ability
to send text commands to it during runtime to execute certain tasks,
such as controlling a servo, displaying text on a screen or launching a
rocket.
We’re basically going to go quickly go through the code in chunks in
this post. But first we’ll briefly explain what our program does.
Our CLI
The primary purpose of this specific code is to control the on-board
LED tied to pin 13 on the Arduino. You can either turn it on, off or
having it blink 10 times at a given frequency. We’ve also included a
help command which explains what each command does as well as an exit
command which just puts the program in a while(1) state.
The Code
The code itself is just over 200 lines where many are just pure
printing functions, so the core functionality is not that complex.
Setting Things up
Let’s start with the global variables, defines and the setup() and loop() functions.
#define LINE_BUF_SIZE 128	//Maximum input string length
#define ARG_BUF_SIZE 64		//Maximum argument string length
#define MAX_NUM_ARGS 8		//Maximum number of arguments

int LEDpin = 13;
int blink_cycles = 10;		//How many times the LED will blink
bool error_flag = false;

char line[LINE_BUF_SIZE];
char args[MAX_NUM_ARGS][ARG_BUF_SIZE];

//Function declarations
int cmd_help();
int cmd_led();
int cmd_exit();

//List of functions pointers corresponding to each command
int (*commands_func[])(){
	&cmd_help,
	&cmd_led,
	&cmd_exit
};

//List of command names
const char *commands_str[] = {
	"help",
	"led",
	"exit"
};

//List of LED sub command names
const char *led_args[] = {
	"on",
	"off",
	"blink"
};

int num_commands = sizeof(commands_str) / sizeof(char *);

void setup() {
	Serial.begin(115200);
	pinMode(13, OUTPUT);

	cli_init();
}

void loop() {
	my_cli();
}
When the user enters a command, the program will compare it to the strings in commands_str and call the function in commands_func with the same index.
Top-level Functions
The cli_init() function which is called in setup() just displays a short welcome message while my_cli() is where the the magic starts to happen.
void cli_init(){
	Serial.println("Welcome to this simple Arduino command line interface (CLI).");
	Serial.println("Type \"help\" to see a list of commands.");
}


void my_cli(){
	Serial.print("> ");

	read_line();
	if(!error_flag){
		parse_line();
	}
	if(!error_flag){
		execute();
	}

	memset(line, 0, LINE_BUF_SIZE);
	memset(args, 0, sizeof(args[0][0]) * MAX_NUM_ARGS * ARG_BUF_SIZE);

	error_flag = false;
}
The Meat of the CLI
Three important functions are called within my_cli(). These are:
read_line() – this waits for input from the user and stores it in the line string.
parse_line() – this divides the input into arguments and stores them in the args list. The delimiter used is a space.
execute() – this calls the correct function based on the user’s input.
The memset functions reset the line string and the args list to zero.
In the read_line() function we don’t really guard against very long inputs. It is still stored in the line_string Arduino string. This means that very long inputs can still mess with our memory.
In the parse_line() function, strtok() is
the real work horse. This function splits a string into several
substrings where it finds the delimiter specified, which in our case is a
white space. Read more about strtok()here.
The execute() function is pretty straight forward. Notice that the function in commands_func at index i is called when returning from this function within the for loop.
Getting Help
int cmd_help(){
	if(args[1] == NULL){
		help_help();
	}
	else if(strcmp(args[1], commands_str[0]) == 0){
		help_help();
	}
	else if(strcmp(args[1], commands_str[1]) == 0){
		help_led();
	}
	else if(strcmp(args[1], commands_str[2]) == 0){
		help_exit();
	}
	else{
		help_help();
	}
}

void help_help(){
	Serial.println("The following commands are available:");

	for(int i=0; i<num_commands; i++){
		Serial.print("  ");
		Serial.println(commands_str[i]);
	}
	Serial.println("");
	Serial.println("You can for instance type \"help led\" for more info on the LED command.");
}

void help_led(){
	Serial.print("Control the on-board LED, either on, off or blinking ");
	Serial.print(blink_cycles);
	Serial.println(" times:");
	Serial.println("  led on");
	Serial.println("  led off");
	Serial.println("  led blink hz");
	Serial.println("    where \"hz\" is the blink frequency in Hz.");
}

void help_exit(){
	Serial.println("This will exit the CLI. To restart the CLI, restart the program.");
}
Here you have all the help functionality. When the user types help and press enter, the cmd_help() function is called. This function checks what the user wrote after help and call the correct function based on that. help_help(), help_led() and help_exit() are just functions that print stuff to the terminal.
LED Control and a Silly Exit Function
int cmd_led(){
	if(strcmp(args[1], led_args[0]) == 0){
		Serial.println("Turning on the LED.");
		digitalWrite(LEDpin, HIGH);
	}
	else if(strcmp(args[1], led_args[1]) == 0){
		Serial.println("Turning off the LED.");
		digitalWrite(LEDpin, LOW);
	}
	else if(strcmp(args[1], led_args[2]) == 0){
		if(atoi(args[2]) > 0){
			Serial.print("Blinking the LED ");
			Serial.print(blink_cycles);
			Serial.print(" times at ");
			Serial.print(args[2]);
			Serial.println(" Hz.");

			int delay_ms = (int)round(1000.0/atoi(args[2])/2);

			for(int i=0; i<blink_cycles; i++){
				digitalWrite(LEDpin, HIGH);
				delay(delay_ms);
				digitalWrite(LEDpin, LOW);
				delay(delay_ms);
			}
		}
		else{
			Serial.println("Invalid frequency.");
		}
	}
	else{
		Serial.println("Invalid command. Type \"help led\" to see how to use the LED command.");
	}
}

int cmd_exit(){
	Serial.println("Exiting CLI.");

	while(1);
}
The cmd_led() function is the only one that uses three
arguments. The third argument (blinking frequency) is used directly in
the calculation and not just to to define what function to call.
The cmd_exit() doesn’t check other arguments, so no matter what you write after exit, it will run normally.
Summary
The most important thing to learn from this blog post is the core building blocks my_cli(), read_line(), parse_line() and execute() and the general flow of the program. To make it possible for commands to run “simultaneously” you will have to make some fundamental changes to the program flow and make the read function non-blocking.
현재 음성, PC LANs, 비디오 등의 데이터에 대한 표준은 마련되어 있지만, 센서나 컨트롤 디바이스 등의 특별한
필요를 충족시킬 만한 무선 네트워크 표준은 없었다. 센서 및 컨트롤 디바이스들은 높은 주파수 대역폭을 필요로 하지 않지만,
배터리의 장기간 사용과 디바이스들의 넓은 배열을 위해서, 짧은 대기시간 및 낮은 에너지 소비를 필요로 한다.
오늘날 높은 데이터율을 필요로 하지 않으면서 적은 비용과 적은 소비 전력으로 동작할 수 있는 다양한 무선통신 시스템이 생산되고 있다.
이렇게 생산되는 제품들은 표준 없이 제작되고 있고, 결국 이러한 과거의 제품들은 각 제품들과의 호환성 문제를 일으키고, 더불어 새로운 기술들과의 호환성에도 문제가 생긴다.
지그비 소개
지그비는
IEEE 802.15.4-2003을 기반으로 한 작고, 저전력의 디지털 라디오를 사용하는 하이레벨 통신 프로토콜입니다. IEEE
802.15.4-2003는 단거리 라디오 주파수를 사용하는 램프, 전자계량기, 소비자용 전자제품과 같은 근거리 개인 무선통신망의
기준이다. 지그비는 낮은 데이터률, 적은 배터리 소모, 네트워크의 안전성을 요구하는 RF 어플리케이션에 주로 사용된다.
지그비 특징
01.저전력 소모, 간단한 구현
02.한번의 배터리 충전으로 수 개월, 또는 수년간 사용 가능
03.활성 모드(수신, 송신), 슬립 모드를 가짐.
04.디바이스, 설치, 유지 등 모두 상대적으로 낮은 비용으로 가능
05.안전성(보안성)
06.신뢰성
07.유연성
08.매우 작은 프로토콜 스택
09.상호 호환가능 및 어느 곳에서나 사용 가능
10.네트워크당 높은 노트 밀집(지그비의 IEEE 802.15.4 사용은 네트워크에서 많은 디바이스를 다루는 것을 가능케 함. 이러한 특징으로 방대한 센서 배열과 네트워크의 통제가 가능)
11.간단한 프로토콜, 국제적으로 구현(지그비 프로토콜 스택 코드의 크기는 블루투스나 802.11의 사이즈에 비해 4분의 1 정도에 불과하다.)
지그비의 사용분야
지그비는 현재, 산업용 제어, 임베디드 센서, 의학자료 수집, 화재 및 도난, 빌딩 자동화, 홈 오토메이션 등의 분야에 사용되고 있다.
□ 스마트 에너지
스마트
에너지는 유틸리티/에너지 서비스 제공자에게, 에너지를 관리할 수 있는 안전하고 사용이 편한 가정 무선 네트워크를 제공한다.
스마트 에너지는 유틸리티/에너지 서비스 제공자 혹은 그들의 고객들에게 온도조절장치 또는 다른 연계된 장치들을 직접 통제할 수
있도록 해준다.
□ 홈 엔터테인먼트와 제어
스마트 전원, 발전된 온도조절 시스템, 안전성 과 보안성, 영화와 음악
□ 홈 인식 시스템
수온 센서, 전원센서, 에너지 모니터링, 화재 및 도난 감시, 스마트 장치들과 접속 센서
□ 모바일 서비스
모바일 결제, 모바일 모니터링 및 통제, 모바일 보안과 접속 통제, 모바일 헬스케어 및 원격 지원
□ 상업 빌딩
에너지 모니터링, 공기조화설비, 조명, 출입 통제
□ 산업용 공장
프로세스 통제, 자재관리, 환경관리, 에너지 관리, 산업 디바이스 제어, M2M 통신
지그비 디바이스 타입
지그비 디바이스에는 다음 3가지 종류가 있다
□ 지그비 코디네이터
가장
중요한 디바이스로 네트워크를 형성하고 다른 네트워트들과 연결시킨다. 각각의 네트워크에는 단 한 개의 코디네이터가 있다. 지그비
코디네이터는 네트워크에 관한 정보를 저장할 수 있고, trust center 또는 보안 키를 위한 저장소로서의 역할도 수행한다.
□ 지그비 라우터
라우터는 애플리케이션 기능뿐만 아니라, 다른 디바이스로부터의 데이터를 전달할 수 있는 라이터로서의 기능도 할 수 있다.
□ 지그비 엔드 디바이스
지그비 엔드 디바이스는 부모 노드와 통신할 수 있는 기능을 포함한다. 이러한 관계는 노드가 오랜 시간을 대기할 수 있도록 하여 배터리 수명을 더욱 길게 연장할 수 있다.
지그비 스택
지그비는 다른 많은 프로토콜 스택보다 간단하며, 지그비 스택 코드의 크기는 다른 프로토콜에 비해 작다. MAC과 PHY는 IEEE
802.15.4 standard에 의해서 정의된다. 네트워크와 애플리케이션 레이어들은 장비 디자이너에 의해 제공되는 actual
application과 Zigbee Alliance에 의해서 정의된다.
802.15.4
802.15.4는 가벼운 무선 네트워크를 위한 간단한 패킷 데이터 프로토콜이다. 802.15.4는 배터리 수명이 중요한
애플리케이션을 모니터링 하고 컨트롤하기 위해서 만들어졌다. 802.15.4는 지그비의 뛰어난 배터리 수명의 근원이 된다.
802.15.4는 IEEE long/short addressing 둘다를 적용 가능하다. Short addressing은
네트워크 ID가 임시로 정해지는 네트워크 관리에 사용된다. 이것은 적은 비용이 들도록 하지만 여전히 65,000여개의 네트워크
노드를 사용 가능케 한다.
신뢰성 있는 데이터 전송
비콘 관리
지그비
네트워크 레이어는 MAC레이어의 적절한 운영을 보장하고, 애플리케이션 레이어에 인터페이스를 제공한다. 네트워크 레이어는
스타, 트리, 매쉬 토폴로지를 지원한다. 네트워크 레이어는 네트워크가 시작되고, 결합하고, 소멸되고, 검색되는 곳이다.
네트워크 레이어는 라우팅과 보안을 담당한다.
애플리케이션 프레임워크는, 애플리케이션 객체가 데이터를 주고 받을 수 있는 실행 환경이다. 애플리케이션 객체는 지그비
디바이스의 생산자에 의해서 정해진다. 지그비에 의해 정의된 바에 의하면, 애플리케이션 객체는 애플리케이션 레이어의 최상단에
위치하고, 디바이스 제조자에 의해 결정된다. 애플리케이션 객체는 실질적으로 애플리케이션을 구축한다; 이것은 전구, 조명 스위치,
LED, I/O 라인 등등이 될 수 있다.
애플리케이션/프로파일
지그비는 다음과 같은 프로파일을 지원한다.
ZigBee Home Automation
ZigBee Smart Energy 1.0
ZigBee Telecommunication Services
ZigBee Health Care
ZigBee Remote Control
지그비 스택 비교
Feature
ZigBee 2006
ZigBee 2007
ZigBee Pro
Size in ROM/RAM
Smallest
Small
Bigger
Stack Profile
0x01
0x01
0x02
Maximum hops
10
10
30
Maximum nodes in network
31,101
31,101
65,540
Mesh Networking
Yes
Yes
Yes
Broadcasting
Yes
Yes
Yes
Tree routing
Yes
Yes
No
Frequency Agility
No
Yes
Yes
Bandwidth used by Protocol
Least
More
Most
Fragmentation
No
Yes
Yes
Multicasting
No
No
Yes
Source routing
No
No
Yes
Symmetric Links
No
No
Yes
Standard Security (AES 128 bit)
Yes
Yes
Yes
High Security (SKKE)
No
No
Yes
Profiles support
Home Automation
Home Automation
Home Automation
Smart Energy
Commercial Building
Industrial Plant Monitor
지그비 2006, 지그비 2007, 지그비 프로의 호환성
지그비 2007은 지그비2006 디바이스들과 완벽히 호환 가능하다. 지그비 2007 디바이스는 지그비 2006 네트워크에 참여, 동작이 가능하고 또 그 반대로도 가능하다.
라우팅 옵션의 차이 때문에, 지그비 프로 디바이스는 지그비2006 네트워크에서 non-routing ZigBee End-Devices (ZEDs) 가 되어야 한다.
지그비, Wi-Fi, 블루투스 비교
ZigBee
Wi-Fi
Bluetooth
Application
Monitoring and Control
Email, Web, Video
Cable replacement
Physical/ MAC layers
IEEE 802.15.4
IEEE 802.11
IEEE 802.15.1
Data Rate
250 Kbits/s
11 & 54 Mbits/sec
1 Mbits/s
Range
10-100 meters
50-100 meters
10 meters
Networking Topology
Mesh
Point to hub
Ad-hoc, very small networks
Operating Frequency
2.4 GHz
2.4 and 5 GHz
2.4 GHz
Complexity (Device and application impact)
Low
High
High
Power Consumption
low
High
Medium
Number of devices for Network
64K
32 per access point
7
Network Latency
New slave enumeration
30 ms
-
20 sec
Network Latency
Sleeping slave changing to active
Devices can join an existing network in under 30ms
Device connection requires 3-5 seconds
Device connection requires up to 10 seconds
Typical Applications
Industrial control and monitoring, sensor networks, building automation, home control and automation, toys, games
Wireless LAN connectivity, broadband Internet access
Wireless connectivity between devices such as phones, PDA, laptops, headsets
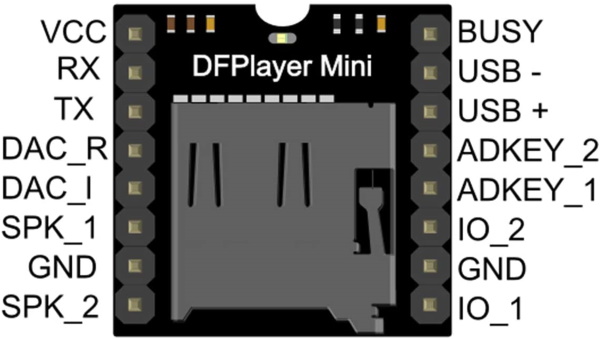
Loudspeaker – up to 3W (amplifier on board) DAC (for headphones or amplifiers)
핀아웃
>> Example Code.
https://github.com/DFRobot/DFRobotDFPlayerMini
/***************************************************
 Modified (by Wolfgang Ewald) Version of the FullFunction.ino example sketch of the DFRobotDFPlayerMini library:

 DFPlayer - A Mini MP3 Player For Arduino
 <https://www.dfrobot.com/product-1121.html>

 ***************************************************
 This example shows the all the function of library for DFPlayer.

 Created 2016-12-07
 By [Angelo qiao](Angelo.qiao@dfrobot.com)

 GNU Lesser General Public License.
 See <http://www.gnu.org/licenses/> for details.
 All above must be included in any redistribution
 ****************************************************/

/***********Notice and Trouble shooting***************
 1.Connection and Diagram can be found here
<https://www.dfrobot.com/wiki/index.php/DFPlayer_Mini_SKU:DFR0299#Connection_Diagram>
 2.This code is tested on Arduino Uno, Leonardo, Mega boards.
 ****************************************************/

#include "Arduino.h"
#include "SoftwareSerial.h"
#include "DFRobotDFPlayerMini.h"

SoftwareSerial mySoftwareSerial(10,11); // RX, TX
DFRobotDFPlayerMini myDFPlayer;
void printDetail(uint8_t type, int value);

void setup()
{
  mySoftwareSerial.begin(9600);
  Serial.begin(9600);

  Serial.println();
  Serial.println(F("DFRobot DFPlayer Mini Demo"));
  Serial.println(F("Initializing DFPlayer ... (May take 3~5 seconds)"));

  if (!myDFPlayer.begin(mySoftwareSerial)) {  //Use softwareSerial to communicate with mp3.
    Serial.println(F("Unable to begin:"));
    Serial.println(F("1.Please recheck the connection!"));
    Serial.println(F("2.Please insert the SD card!"));
    while(true);
  }
  Serial.println(F("DFPlayer Mini online."));
  printHelp();

  myDFPlayer.setTimeOut(500); //Set serial communictaion time out 500ms

  //----Set volume----
  myDFPlayer.volume(10);  //Set volume value (0~30).
 // myDFPlayer.volumeUp(); //Volume Up
 // myDFPlayer.volumeDown(); //Volume Down

  //----Set different EQ----
  myDFPlayer.EQ(DFPLAYER_EQ_NORMAL);
//  myDFPlayer.EQ(DFPLAYER_EQ_POP);
//  myDFPlayer.EQ(DFPLAYER_EQ_ROCK);
//  myDFPlayer.EQ(DFPLAYER_EQ_JAZZ);
//  myDFPlayer.EQ(DFPLAYER_EQ_CLASSIC);
//  myDFPlayer.EQ(DFPLAYER_EQ_BASS);

  //----Set device we use SD as default----
//  myDFPlayer.outputDevice(DFPLAYER_DEVICE_U_DISK);
  myDFPlayer.outputDevice(DFPLAYER_DEVICE_SD);
//  myDFPlayer.outputDevice(DFPLAYER_DEVICE_AUX);
//  myDFPlayer.outputDevice(DFPLAYER_DEVICE_SLEEP);
//  myDFPlayer.outputDevice(DFPLAYER_DEVICE_FLASH);

  //----Mp3 control----
//  myDFPlayer.sleep();     //sleep
//  myDFPlayer.reset();     //Reset the module
//  myDFPlayer.enableDAC();  //Enable On-chip DAC
//  myDFPlayer.disableDAC();  //Disable On-chip DAC
//  myDFPlayer.outputSetting(true, 15); //output setting, enable the output and set the gain to 15


}

void loop(){
  if(Serial.available()){
    readCommand();
  }

  if (myDFPlayer.available()) {
    printDetail(myDFPlayer.readType(), myDFPlayer.read()); //Print the detail message from DFPlayer to handle different errors and states.
  }
}

void readCommand(){
  char cmd = ' ';
  int value1, value2 = 0;
  cmd = Serial.read();
  value1 = Serial.parseInt();
  value2 = Serial.parseInt();

  switch(cmd){
    case 'h':
      printHelp();
      break;

    case '>':
      myDFPlayer.next();
      break;

    case '<':
      myDFPlayer.previous();
      break;

    case 'p':
      if(value2 == 0) myDFPlayer.play(value1);
      else if(value1 != 0) myDFPlayer.playFolder(value1, value2);
      break;

    case 'P':
      if(value2 == 0) myDFPlayer.playMp3Folder(value1);
      else if(value1 != 0)myDFPlayer.playLargeFolder(value1, value2);
      break;

    case '+':
      myDFPlayer.volumeUp();
      break;

    case '-':
      myDFPlayer.volumeDown();
      break;

    case 'v':
      myDFPlayer.volume(value1);
      break;

    case 'b':
      myDFPlayer.pause();
      break;

    case 's':
      myDFPlayer.start();
      break;

    case 'z':
      myDFPlayer.sleep();
      break;

    case 'L':
      if(value1 == 0) myDFPlayer.enableLoopAll();
      else myDFPlayer.loopFolder(value1);
      break;

    case 'l':
      if(value1 == 0) myDFPlayer.disableLoopAll();
      else myDFPlayer.loop(value1);
      break;

    case 'A':
      myDFPlayer.advertise(value1);
      break;

    case 'a':
      myDFPlayer.stopAdvertise();
      break;

    case 'q':
      if(value1 == 1) Serial.println(myDFPlayer.readState());
      else if(value1 == 2) Serial.println(myDFPlayer.readVolume());
      else if(value1 == 3) Serial.println(myDFPlayer.readEQ());
      else if(value1 == 4) Serial.println(myDFPlayer.readFileCounts());
      else if(value1 == 5) Serial.println(myDFPlayer.readFolderCounts());
      else if(value1 == 6) Serial.println(myDFPlayer.readCurrentFileNumber());
      break;
    default:
      Serial.println("Ungültiges Kommando");
      break;
  }

}

void printHelp(){
  Serial.println("DFPlayer Commands:");
  Serial.println(" h - help");
  Serial.println(" > - next ");
  Serial.println(" < - previous");
  Serial.println(" p3 - play");
  Serial.println(" p3,5 - play folder 3, file 5");
  Serial.println(" P3,5 - play large folder 3, file 5");
  Serial.println(" P3 - play file 3 in MP3 folder");
  Serial.println(" + - volume up");
  Serial.println(" - - volume down");
  Serial.println(" v10 - set volume to 10");
  Serial.println(" b - Pause");
  Serial.println(" s - start ");
  Serial.println(" z - sleep ");
  Serial.println(" L - enable loop all");
  Serial.println(" l - disable loop all");
  Serial.println(" L3 - loop folder 3");
  Serial.println(" l3 - loop file 3");
  Serial.println(" A3 - advertise file 3");
  Serial.println(" a - stop advertise ");
  Serial.println(" qx - query No. x");
  Serial.println("     x = 1 - read state");
  Serial.println("     x = 2 - read volume");
  Serial.println("     x = 3 - read equalizer");
  Serial.println("     x = 4 - read file counts");
  Serial.println("     x = 5 - read current file number");
  Serial.println("     x = 6 - read file counts in folder");
  Serial.println("     x = 7 - read folder counts");
}

void printDetail(uint8_t type, int value){
  switch (type) {
    case TimeOut:
      Serial.println(F("Time Out!"));
      break;
    case WrongStack:
      Serial.println(F("Stack Wrong!"));
      break;
    case DFPlayerCardInserted:
      Serial.println(F("Card Inserted!"));
      break;
    case DFPlayerCardRemoved:
      Serial.println(F("Card Removed!"));
      break;
    case DFPlayerCardOnline:
      Serial.println(F("Card Online!"));
      break;
    case DFPlayerUSBInserted:
      Serial.println("USB Inserted!");
      break;
    case DFPlayerUSBRemoved:
      Serial.println("USB Removed!");
      break;
    case DFPlayerPlayFinished:
      Serial.print(F("Number:"));
      Serial.print(value);
      Serial.println(F(" Play Finished!"));
      break;
    case DFPlayerError:
      Serial.print(F("DFPlayerError:"));
      switch (value) {
        case Busy:
          Serial.println(F("Card not found"));
          break;
        case Sleeping:
          Serial.println(F("Sleeping"));
          break;
        case SerialWrongStack:
          Serial.println(F("Get Wrong Stack"));
          break;
        case CheckSumNotMatch:
          Serial.println(F("Check Sum Not Match"));
          break;
        case FileIndexOut:
          Serial.println(F("File Index Out of Bound"));
          break;
        case FileMismatch:
          Serial.println(F("Cannot Find File"));
          break;
        case Advertise:
          Serial.println(F("In Advertise"));
          break;
        default:
          break;
      }
      break;
    default:
      break;
  }
}